Visualizzazione post con etichetta configuration. Mostra tutti i post

mercoledì 6 febbraio 2013

Enabling and using log4j on JBoss AS 7

Hi all,
today we will see how to enable and use log4j on JBoss as 7.
As you may already know JBoss comes already with his own version of log4j which is located under %jboss-home/modules/org/apache/log4j.


The following steps explains you what you have to do:
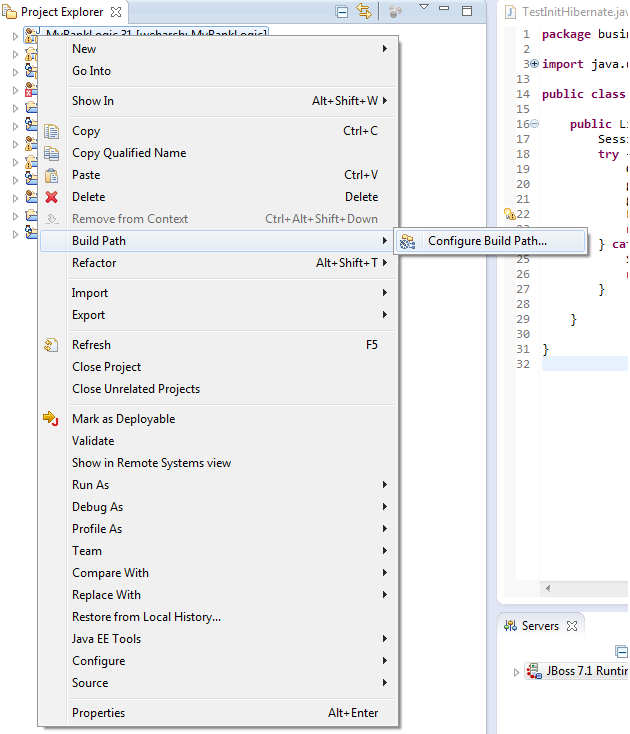
  1.  add the log4j.jar to your classpath, this may be done easly with the following steps
    • right click on your application - ejbmodule, Build path , configure build path..
    • then Add external jar, which you will find in the path mentioned above 
  2. Configure the logger. See below.
  3. Go the class you want to use the logger, suppose is in "mypackage.subpackage"
    add the import at the top of the class
    import org.apache.log4j.Logger;
  4.  create a field with the logger:
    private static Logger logger = Logger.getLogger(YourEJBClass.class);
  5. use the logger
    logger.info("started"); logger.debug("value of x" + x.toString());

Configure the logger

JBoss already comes with a configuration file under %Jboss-home/standalone/configuration/standalone.xml.
By default, your logger will output to server.log and console, but you can add some appender to output your app logs to another file.
Stop the server before start modifing the standalone.xml.
Log4j is highly customizable, here is a basic configuration:

<periodic-rotating-file-handler name="FILETWO">
  <formatter>
    <pattern-formatter pattern="%d{HH:mm:ss,SSS} %-5p [%c] (%t) %s%E%n"/>
  </formatter>
  <file relative-to="jboss.server.log.dir" path="mylogfile.log"/>
  <suffix value=".yyyy-MM-dd"/>
  <append value="true"/>
</periodic-rotating-file-handler>
This will be added in the standalone.xml, you can put it in the subsystem forlogging, after the CONSOLE one and the FILE one.

After this snippet of code, and before the <root-logger> node you can put the following snippet
<logger category="mypackage.subpackage">
    <level name="DEBUG"/>
    <handlers>
        <handler name="CONSOLE"/>
        <handler name="FILETWO"/>
    </handlers>
</logger>
Start again the server and enjoy your logging system.


sources: my original question at stackoverflow. Rafael answers and his blog

venerdì 21 dicembre 2012

Installing and configuring JBoss

As you may have noticed if you installed Netbeans (the full version) as IDE, you have also installed the latest version of tomcat and the latest version of glassfish.
For many of you thoose servers may be enought to start writing code, and testing the available technologies.

With this post we will explain you how to install a new server: JBoss AS 7, that for many of you may be already a know resource, but for other may be a new one.

This server that will be installed is Java EE compliant, as glassfish is (remember that Tomcat is not), and is provided by JBoss (http://www.jboss.org/).

So let's start.


1) Install latest version of JBoss AS (7 currently, at the time of the post writing).

Instruction for doing so can be found here for those who use Windows OS
https://docs.jboss.org/author/display/AS7/Installing+and+starting+JBoss+AS+on+Windows

for the others who use Linux based systems or MacOS

https://docs.jboss.org/author/display/AS7/Installing+and+starting+JBoss+AS+on+Linux,+Unix+or+Mac+OS+X


We installed JBoss on windows 7, Mac Os 10.6 and Ubuntu 10.10 and the lastest Linux Mint (at writing time), it is working perfectly without any problem.

RECAP OF INSTALLING: unzip and choose a folder where to place it. That place will be - inside the jboss 7.1.x - the home for the server.

At this point you have JBoss AS 7 installed.

2) Configure IDE

For the sake of semplicity we'll use Eclipse for which there are the latest updates available coming directly from the jboss comunity (i have to say that personally i like more NetBeans - that atm does not support JBAS7).
Once you have eclipse installed follow the steps described here

https://www.jboss.org/tools/download/installation/update_4_0
(Section is "Installation from update site")

that said, continue with this steps to set up and use Jboss with eclipse

https://docs.jboss.org/author/display/AS7/Starting+JBoss+AS+from+Eclipse+with+JBoss+Tools

once you have finished this step your job is done.
You have successfully configured eclipse to use your jboss server.

Enjoy your server!

Ps: Note that the server provided in this way is suitable only for testing and building application to run on your localhost, for configuring your server in order to accept connection not only from localhost please check out this post http://javafortheweb.blogspot.it/2012/12/accessing-remote-ejb-on-jboss-as-71.html

EDIT: update on 10th april 2013. Tested on Mac OS 10.8.3. Working successfully!

Accessing remote EJB on JBoss AS 7.1 from web application

Finally, after many and many hours spent on a solution, I'm able to deploy an EJB module and access it from a differente machine! Here are the steps:

Environment: 
1) JBoss AS 7.1 running on a Debian Distribution. To build and deploy the EJB module I used Eclipse (juno version)
2) Apache Tomcat 7.0.32 on a DIFFERENT machine on which I'm going to develop a simple servlet to get the remote ejb deployed on JBoss. I used Netbeans 7.2 here, just because I still prefer Netbeans when developing web applications. 


STEP 1. This is the key point of the entire work. I found hundreds of guides on the web explaining how to invoke remote ejb from a separated client, but noone of these pointed out this important issue. Either you are using Glassfish or JBoss to develop your EJB module you first have to set your server in such a way that is reachable from the outside and not only in localhost. To do this you have to edit the server descriptor, in this case ( JBoss ) standalone.xml. In ${JBOSS_HOME}/standalone/configuration/ there is our file, open it. Quite at the end of the file, we can find the interfaces definitions; ADD A NEW INTERFACE (I called it mine), setting the access of it to any ip. The result should be this:


Following the interfaces, we can find the socket-binding-group tag, which sets the ports required for the given interfaces. In our case, change the default-interface parameter to match the new interface ( mine again in this case ); the outpout should be:


STEP 2. Now we need to add a new APPLICATION user to the JBoss server. To do that run the add-user script ( ${JBOSS_HOME}/bin/ ) and select the b) option. The user and password will be used by the client to access the EJB module on the server. The a) option instead (managment user) allow you to create a username and password needed to access the administration panel of JBoss.

STEP 3. We are ready to develop an EJBModule on our JBoss server. Just create for example a stateless session bean on eclipse, providing a remote interface:

session bean pattern:

package ejb;

import javax.ejb.Remote;

@Stateless
@Remote(RemoteFirstBean.class)
public class FirstBean implements RemoteFirstBean{
...
//implemtation of interface's methods
}

interface pattern:

package ejb;

public interface RemoteFirstBean{
//declaration of methods
}

Now we can deploy the module on JBoss, no errors should rise up.

STEP 4. On my client pc, I create a java Web application using Tomcat as web server. After that, just create a servlet including in the processRequest method the following code just to test our remote invocation:

final Hashtable jndiProperties = new Hashtable();
jndiProperties.put(Context.URL_PKG_PREFIXES, "org.jboss.ejb.client.naming");
try {
            final Context context = new InitialContext(jndiProperties);
            String appName = "";
            String moduleName = "jboss-firstbean";
            String distinctName = "";
            String beanName = "FirstBean";
            String interfaceFullName = "ejb.RemoteFirstBean";
            final String jndi = "ejb:" + appName + "/" + moduleName + "/" + distinctName + "/" + beanName + "!" + viewClassName;
            RemoteFirstBean statelessRemote = (RemoteFirstBean)context.lookup(jndi);

        } catch (NamingException ex) {
            System.out.println("problems");
        }

As we can see, first create an InitialContext putting "org.jboss.ejb.client.naming" as url_pkg_prefixes. This tells our application to lookup in his classpath for the jboss-ejb-client.properties file in which it will find all the information to access our remote ejb. Now we just need to lookup in the context for the bean using the jndi specification used the JBoss (remember to include in the project the same interface as the JBoss one). The jndi specification is the following:

ejb:{app-Name}/{module-Name}/{distinct-Name}/{bean-Name}!{fullPath-remote-Interface}

Appname should be the name of the .ear file we have deployed on JBoss (if deploying an Enterprise Application) . In my case I just deployed a .jar file as simple EJB module so app-name will be empty. Module-name is the name of the EJB module deployed ( the .jar file on JBoss ), in my case is "jboss-firstbean". Distinct name as well is empty. The full path of the remote interface in my case is ejb.RemoteFirstBean. The resulting jndi will be:

ejb:/jboss-firstbean//FirstBean!ejb.RemoteFirstBean

After the lookup, we can try some methods of the bean to verify if everything works.

STEP 5. As I said before, we must now set the properties file. It must be placed in the classpath of the web application. Create a file with the name jboss-ejb-client.properties and insert the following(field,value):

remote.connectionprovider.create.options.org.xnio.Options.SSL_ENABLED=false
remote.connections=default
remote.connection.default.host=192.168.1.108
remote.connection.default.port=4447
remote.connection.default.connect.options.org.xnio.Options.SASL_POLICY_NOANONYMOUS=false
remote.connection.default.username=USERNAMEUSEDINSTEP2
remote.connection.default.password=PASSWORDUSEDINSTEP2

4447 is the default port for remoting of JBoss. Just use the Ip of the JBoss server machine.

STEP 6. Last step. In order to use org.jboss.ejb.client.naming on the client application, I needed to include in my project the jboss-client.jar library which can be found in ${JBOSS_HOME}/bin/client/

STEP 7. Run the servlet, and all should works fine :) (EJBModule should be running as well :P )